Subsystem Testing
Power Consumption
Power consumption is measured at the wall using a Kil-A-Watt device. While not the most accurate devices out there, they give us a good ballpark indicator of what’s going on. We also used HWInfo64 to figure out how close the results were, and within a reasonable margin of error, the results can be considered accurate. Do keep in mind that two water pumps and the GPU are part of the equation, but our testing configuration is lean on things like storage. Only the test system is plugged into the Kil-A-Watt, and as a result, peripherals like the monitor aren’t being measured here.
Results were obtained at idle on a fresh boot of the system. We let the system idle for five minutes before checking idle power consumption. Load testing was conducted per AMD’s recommendati0n of using Cinebench to simulate a heavily multi-threaded workload. During the duration of the run, load power is observed and the readings are recorded.
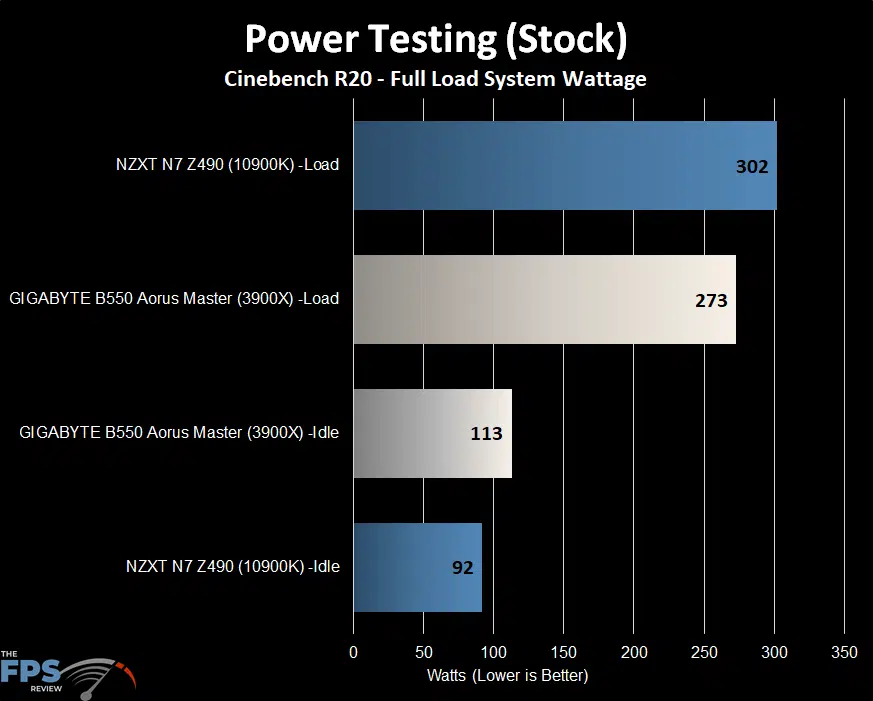
As we’ve changed our test bench configuration, we don’t have much to compare the B550 Aorus Master to. The GIGABYTE Z490 Aorus Master was used for reference. At idle, the B550 Aorus Master test configuration pulled 113w at the wall. When under load, it consumed 273w.
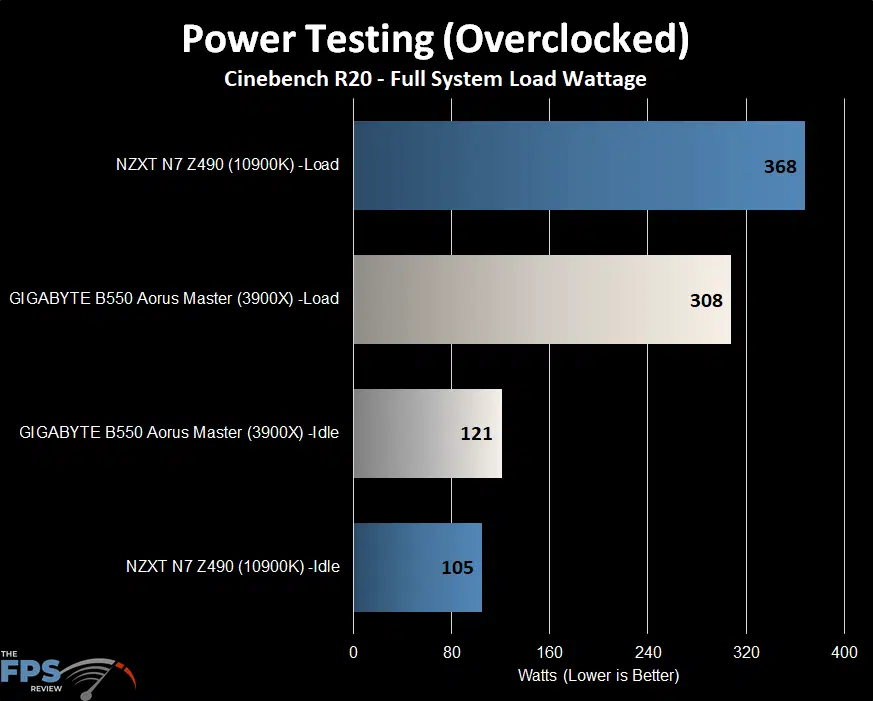
When overclocked, idle power consumption on the B550 Aorus Master increased to 121w from 113w. Power consumption under load increased to 308w from 273w in the earlier test. This result is well under that of the NZXT N7 Z490, which could pull upwards of 368w under load.
Sound Hardware
The GIGABYTE B550 Aorus Master features an onboard Realtek ALC1220 VB HD Audio CODEC. It is listed as a 7.1 channel CODEC. The implementation of the CODEC is standard for the segment. It features the standard PCB isolation, WIMA FKP2 and Nichicon Fine Gold capacitors. These are purpose built for audio devices. It also has a smart headphone AMP, which means it can sense and adjust its impedance to match. This CODEC also boasts an SNR of 110/114dB(A). For those interested in leveraging it, the audio solution also supports DTS X Ultra.
Audio – Subjective Listening
The audio solution was rather good and is generally indistinguishable from most of the higher end implementations of this CODEC I’ve seen. You would have to step up to something considerably more expensive to get a better audio experience. Even then, most people probably wouldn’t notice the difference. Whether you are playing games, listening to music or watching video, the CODEC does precisely what you’d expect it to do and does it well.
Audio – Subjective Recording / Playback
With the microphone boost option enabled, the audio playback yielded no discernible distortion. With the boost option disabled, the CODEC provided clear playback, although the levels were muted as one would expect. Again, the recording capability of the CODEC is good and while probably not the best I’ve ever heard, it’s certainly very capable and would even be adequate judged against some higher end and more expensive motherboards.
DPC Latency
For those who may not know what DPC is, I’ll explain. Deferred procedure calls are a function within Windows that allows higher priority tasks such as device drivers to defer lower priority tasks for execution at later times. It’s an interrupt and reassignment of sorts performed by the operating system.
DPC latency varies from board model to model and brand to brand. DPC issues show up in the form of audio dropouts and streaming video issues. Naturally, this is something that the enthusiast would want to avoid. I used LatencyMon and let it run for 10 minutes to graph the results. I have compiled a list of several systems I’ve tested over the last year and placed the results in a graph for easy reference.
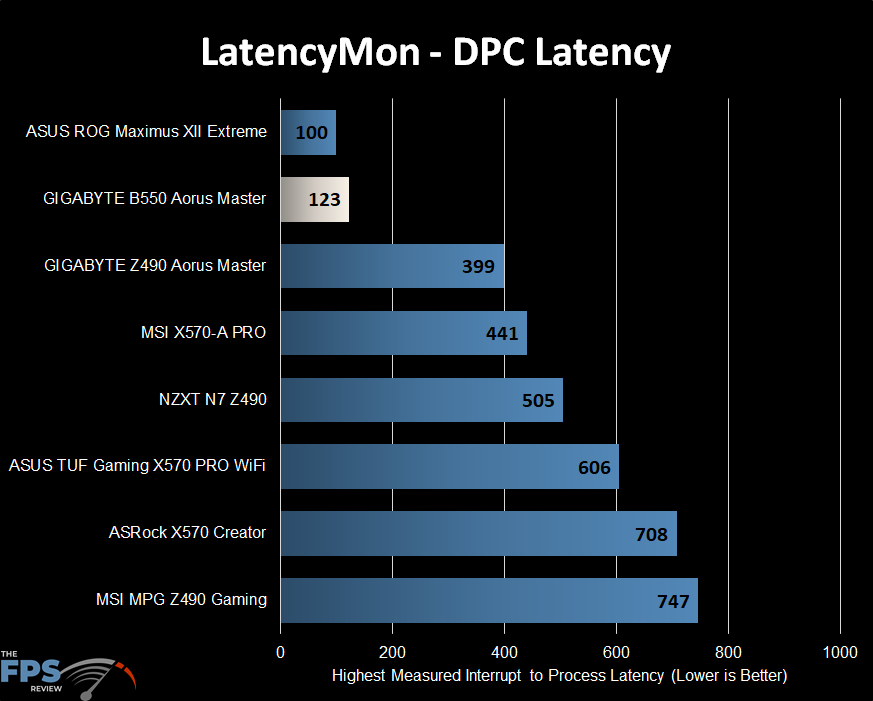
The DPC latency of the GIGABYTE B550 Aorus Master is nothing short of excellent. For a long time I had seen a continuing trend of DPC latency getting worse and worse. As you can see, motherboards like the MSI MPG Z490 Gaming and ASRock X570 Creator are a bit too close to the magic “1000” threshold that you want to be under. However, the B550 Aorus Master barely breaks 100, and is second only to the Maximus XII Extreme, which is saying a lot given the price point of that offering.
Storage Configuration & Testing
For our testing, the operating system is always installed on a Samsung 970 EVO NVMe Plus based SSD. A second, identical drive is employed for testing RAID0 performance on motherboards that support this functionality natively without PCIe adapter kits. In cases where this is necessary, an alternative is used as the OS drive. It is either an Intel SSD 750 via U.2 to PCIe adapter or a SATA based Samsung 840 Pro.
For all non-RAID, M.2 performance testing, we used a Corsair MP600 2TB PCIe 4.0 NVMe drive provided by Corsair and AMD. On AMD chipset based motherboards, this drive is always installed in the M.2 slot which connects directly to the CPU’s PCIe controller. On Intel systems, this drive is attached to PCIe lanes which are provided by the PCH.
GIGABYTE B550 Aorus Master Storage Subsystem and Implementation
The storage configuration of the GIGABYTE B550 Aorus Master is rather interesting and as I stated earlier on in the article, its truly what separates the B550 Aorus Master from every other motherboard I’ve seen. Naturally, with unique implementations there are almost always pros and cons.
The B550 Aorus Master has 3x M.2 slots, which is impressive given the lane count of the B550. Making things more interesting it is the only motherboard I know of that offers 3x M.2 slots which are all fully PCIe Gen 4.0 compliant. Each slot having a full 4x PCIe lanes each. Given that the B550 chipset doesn’t support PCIe Gen 4.0 at all, one has to wonder how this was achieved. The answer is simple: At the cost of lanes assigned to your graphics card. There are a number of PCIe lane switches between the primary PCIe x16 slot and the rest of the expansion slot area, which is where you will find all your M.2 slots.
The top slot gets its lanes from the CPU’s PCI-Express controller, and therefore, you needn’t worry about this one. There are 4x lanes here and they are dedicated, so they don’t cost you anything. Of course, getting PCIe 4.0 compliance requires the installation of a Ryzen 3000 or 5000 series CPU. The other two slots actually reduce the primary PCI-Express x16 slot to 8 lanes. Of course getting PCIe 4.0 compliance also requires installing a PCIe Gen 4.0 capable GPU in order to put those lanes into PCIe Gen 4.0 mode.
Now, in Gen 3.0 mode, you could lose some performance from your GPU in specific scenarios. I won’t get too far into the weeds on this, but suffice it to say, its usually not a big deal but it is something to consider before loading up M.2 drives onto the B550 Aorus Master. That being said, in PCIe Gen 4.0 mode, you should be fine as the bandwidth is equal to a PCIe 3.0 x16 slot using only half as many lanes. The other upside to this configuration is that you can run all these M.2 slots without sacrificing PCIe lanes that would ordinarily be used for SATA devices or anything else.
It is an innovative design, and something I’m glad to see here. Although, it does contribute to the cost of the B550 Aorus Master, which I believe is the most expensive B550 motherboard out there. If not, its up there with the best of them. It’s nearly X570 money, so that’s something to think about.
USB Ports
Below, I’ve outlined the USB configuration as it’s listed on the manufacturer’s website.
- 4 x USB 3.2 Gen 2 Type-A ports (red) on the back panel
- Chipset:
- 1 x USB Type-C™ port on the back panel, with USB 3.2 Gen 2 support
- 1 x USB 3.2 Gen 2 Type-A port (red) on the back panel
- 2 x USB 3.2 Gen 1 ports available through the internal USB header
- 2 x USB 2.0/1.1 ports on the back panel
- Chipset+2 USB 2.0 Hubs:
- 8 x USB 2.0/1.1 ports (4 ports on the back panel, 4 ports available through the internal USB headers)
The USB configuration on the B550 Aorus Master is roughly what you’d typically expect. The only thing that I would point out is that the USB ports attached to the PCH are going through internal hubs. This means the bandwidth is shared, though this is typically not a problem. You would want to use devices that depend on speed in your 3.2 Gen 2 ports anyway. This method also avoids the typical compatibility problems you get with simply adding more controllers, as some boards do.
NVMe Testing
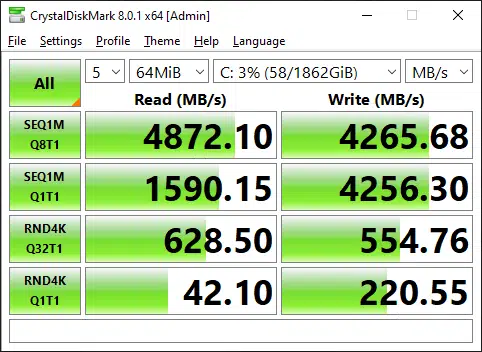
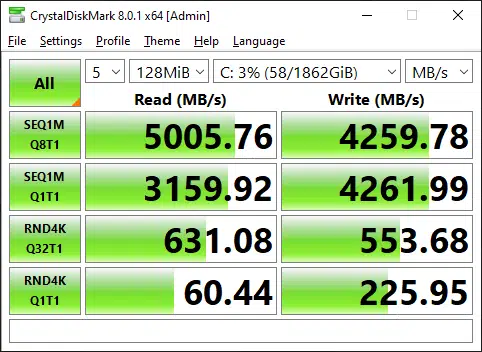
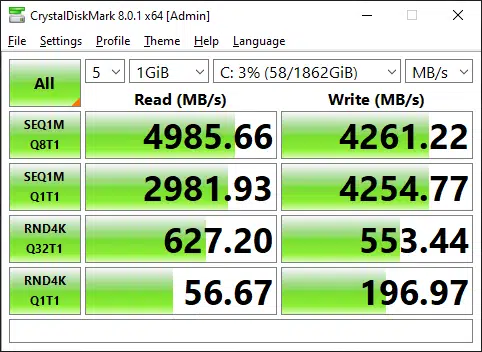
In the NVMe testing, we saw results across all three tests that are roughly in line with the manufacturer’s specifications for the drive. These results are consistent with what we’ve seen on other motherboards in PCIe Gen 4.0 mode. Obviously, if we had tested this on a Z490 board, we wouldn’t have seen the same numbers.
Network Subsystem Testing
Testing Methodology (Wired)
LAN Speed Test software was used with the Windows Task Manager to determine the performance levels of the onboard network interface. LAN Speed Test was used to measure bandwidth and transfer speeds, while Windows Task Manager monitored CPU utilization on the test system. For the testing, an 800MB file test was used with the default packet configuration for the application.
The test was run three times with the middle result chosen. Results were captured for the low, medium, and high transfer rates. The test was performed using a plenum rated category 6e crossover cable to bypass any traffic, routing, or other transfer issues and possible packet loss or corruption that can be caused by a router/switch or hub. The cables were connected between two test machines, one using the onboard NIC(s) of the board being reviewed and the other is a Killer E3000 2.5GbE adapter built into the MSI MEG X570 GODLIKE motherboard. In cases where greater speeds are required, I use the Aquantia AQtion 10Gbit adapter that’s bundled with the same MSI motherboard.
Testing Methodology (Wireless)
The same software and protocols are observed for wireless networking as well. However, due to the issues of sometimes creating Ad Hoc networks, I test using the wireless router provided by my ISP. This, while not indicative of maximum speeds attainable by these controllers, does indicate a more typical setup. The test was run three times with the middle result chosen. Results were captured for the low, medium, and high transfer rates. Unfortunately, I do not yet have WiFi 6 infrastructure available for testing, so these results are more of a function than a speed test.
Wired Networking Tests – Realtek RTL8125GB
The B550 Aorus Master has a single Realtek RTL8215GB 2.5GbE Ethernet adapter. It is capable of 100Mbit, 1GbE and 2.5GbE speeds. While Realtek isn’t usually my favorite option, it works well.


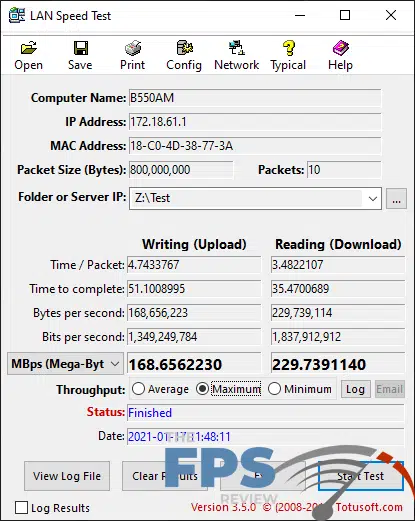
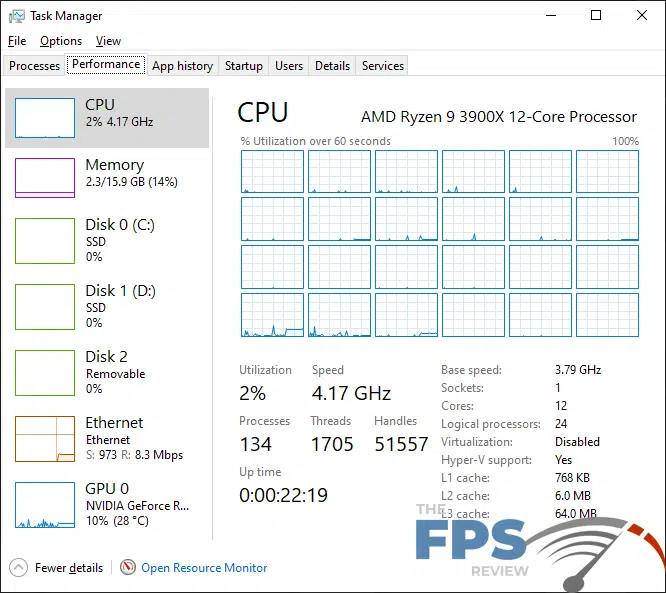

In this test, our 2.5GbE adapter managed a minimum transfer rate of 152.77MBps in the write or upload test. The average transfer rate was only slightly higher in the same test at 156.55MBps. The maximum transfer speed was certainly higher, but still relatively close to the average transfer rate at 168.65MBps. CPU usage in this test was 2%.
In the read or download test, the minimum throughput was 217.43MBps. The average and maximum transfer rates were 225.54MBps and 229.73MBps respectively. CPU usage in this test was also a mere 2% with no significant loading on any specific cores or threads. Naturally, there is some jumping around in the utilization from moment to moment, but overall it remained around the 2% mark in both the upload and download tests.
Wireless Networking Tests – Intel Wireless AX200 WiFi 6
GIGABYTE opted to use Intel’s AX200 WiFi 6 wireless network controller. It supports a/b/g/n/ac and ax standards, as well as being 2.4/5GHz dual band capable. It does support the 802.11ax 160MHz standard which theoretically allows for speeds upwards of 2.4Gbps. As always, your mileage on this will vary greatly. At present, we do not have a WiFi 6 infrastructure for testing. Therefore this test is less of a benchmark and more of a function check to make sure it worked the way it is supposed to.
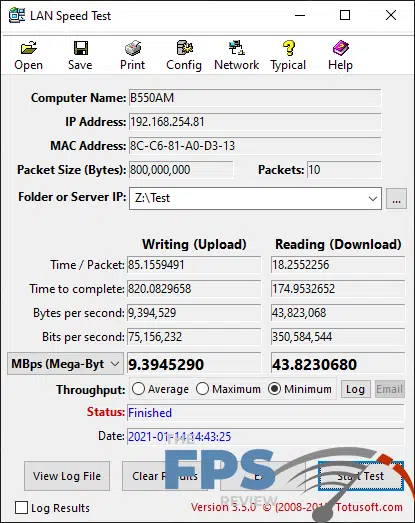

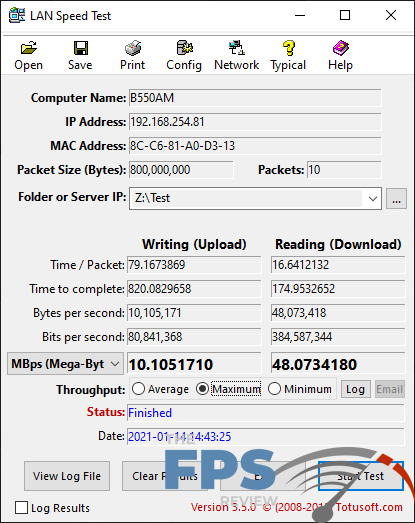

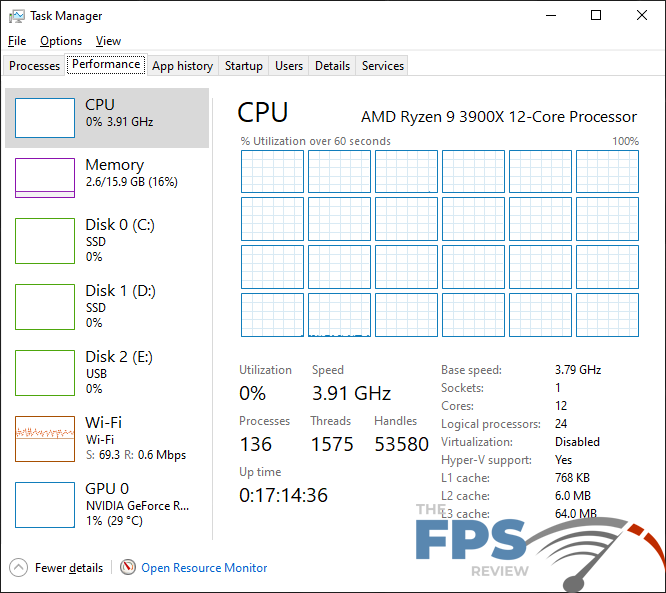
In the write or upload test, we saw minimum, average and maximum transfer rates of 9.39MBps, 9.75MBps, and 10.10MBps respectively. CPU usage was so low it didn’t even register. You can see a few small spikes in CPU utilization here and there on various cores, but overall, the usage was among the lowest I’ve recorded so far.
In the download or read test, we saw a minimum, average and maximum throughput of 43.82MBps, 45.72MBps, and 48.07MBps. CPU utilization was again 0% with small spikes showing up on the graphs here and there. Core loading was similar, but remained almost immeasurable most of the time.
Overall, the wireless solution worked very well. I had no trouble getting connected and signal strength appeared to be solid. The performance results weren’t amazing, but again we are only using the wireless router provided by our ISP. Which, as we all know is junk in the first place.