Introduction
This article is intended to detail The FPS Review test system build, review format, and methodology for reviewing SSDs and other similar storage devices. Our goal is to maintain consistency, repeatability, and accuracy and allow data to be compared in each review.
Our goal is to build a database of benchmarks so that you can compare the results between SSDs and storage devices. In order to accomplish this, our format and methodologies must be standardized. This standardization must be adhered to from the handling of the hardware installation, down to the software and settings. You can check out our catalog of storage reviews here.
Our computer test build has been updated as of August 2023, with a new system build to facilitate PCIe Gen5 SSD reviews. Starting August 23rd, 2023 all SSD reviews onward utilize the new test system, format, and methodology in this article. Prior to this date, SSD reviews used a different test system build, please refer to the Test Setup page on each SSD review where system specs are listed for each review.
The Test Bench (2023 Build)


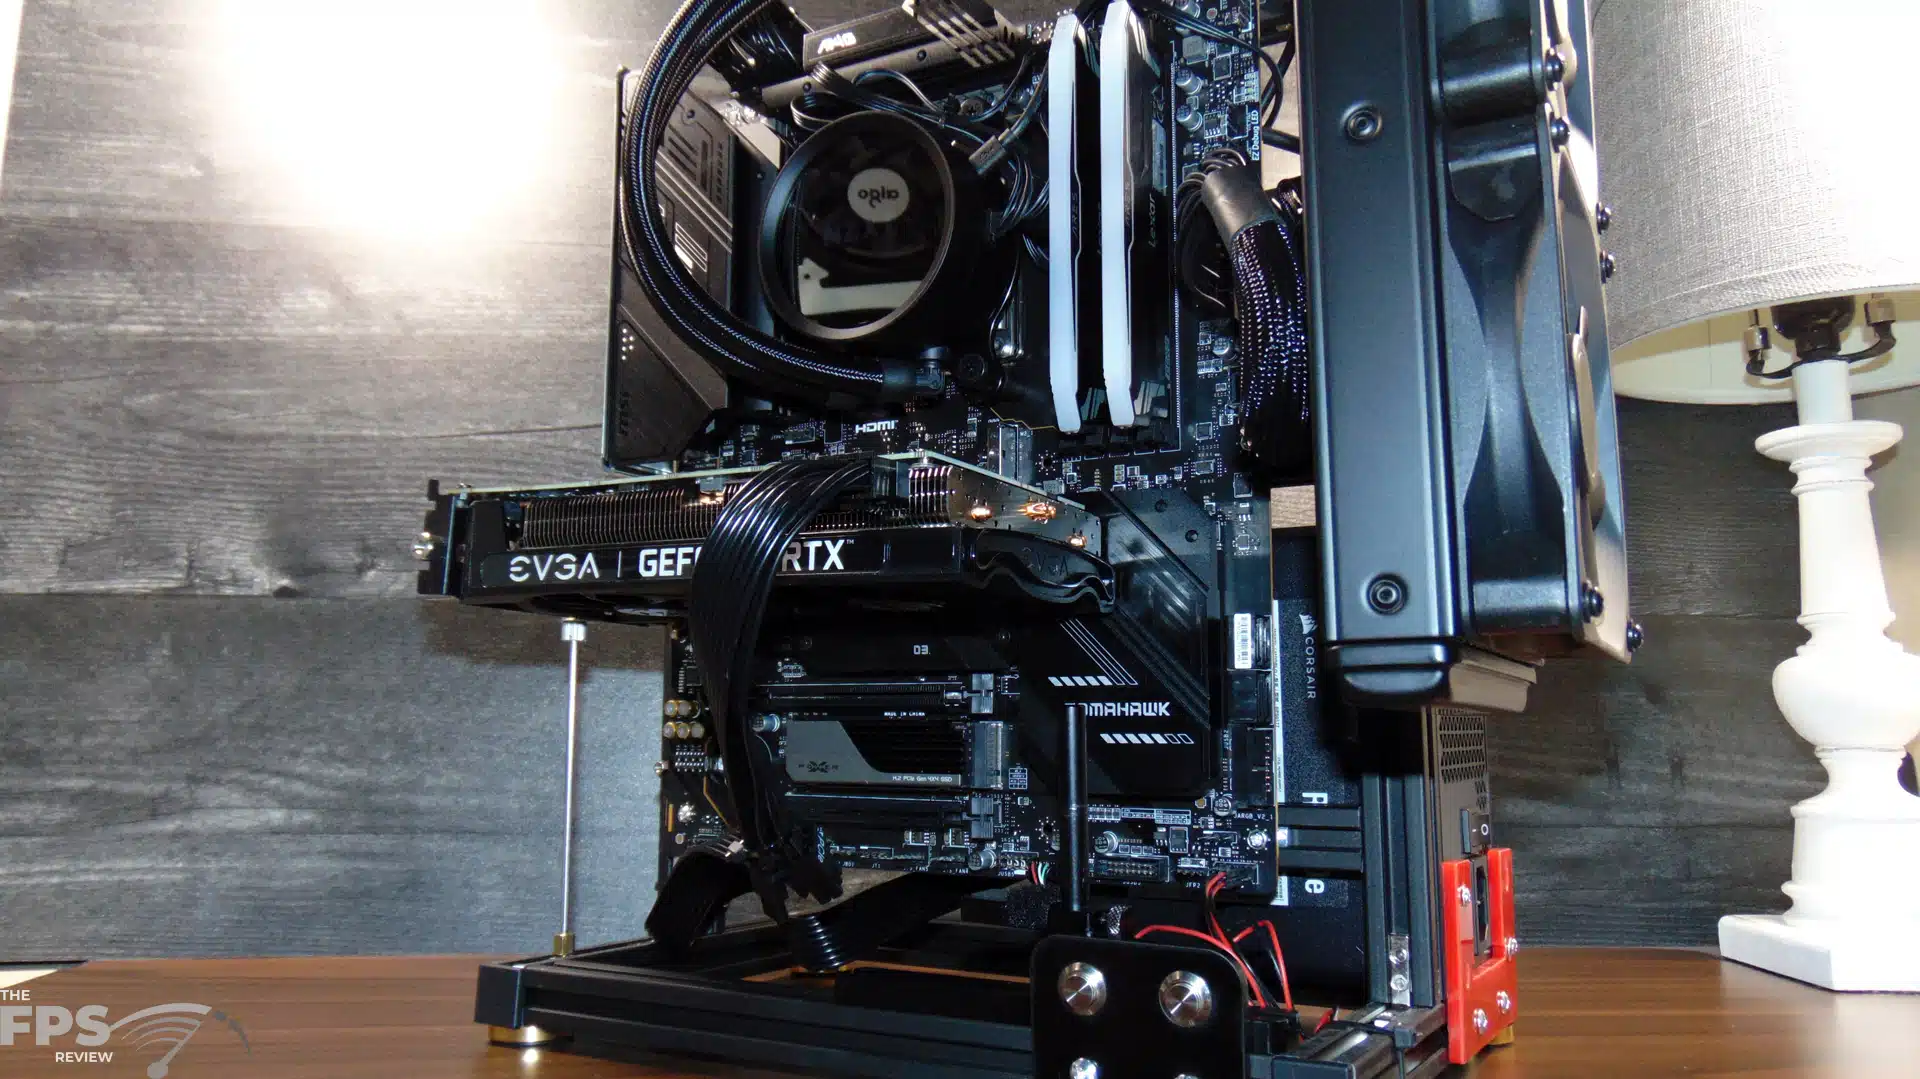
| HAIHUANG ATX Test Bench Frame Chassis with Handle |
| Corsair RM750e 750W ATX 3.0 Compliant PSU |
| MSI MAG X670E TOMAHAWK WIFI Motherboard |
| AMD Ryzen 9 7950X3D CPU |
| NZXT Kraken X53 240mm AIO |
| Lexar ARES DDR5 32GB 6000MHz Memory |
| EVGA GeForce RTX 3060 XC BLACK GAMING |
| Silicon Power XS750 1TB PCIe Gen4 NVMe SSD |
This test rig will be capable of PCIe Gen5 SSD testing. The specs have been upgraded from our previous test rig for SSDs. This is a dedicated machine that will do nothing but SSD testing, and allow us to throw on SSDs quickly, and throw as many as possible at it to really pump up our SSD testing and volume.
It all starts with the hardware, and since we are very hardware-oriented enthusiasts here at TheFPSReview.com this is where we will start. The test bench will remain standardized, and consistent. Every SSD and storage device will be tested on this exact same test system. We are aware that any major changes to the test system could affect results.
The MSI MAG X670E TOMAHAWK WIFI Motherboard uses the AMD X670E Chipset and supports PCIe Gen5 SSDs. We will utilize the M.2_1 Source (From CPU) slot for SSD reviews which supports up to PCIe 5.0 x4 and supports 22110/2280 devices.
We use an AMD Ryzen 9 7950X3D CPU for maximum throughput performance in long queue depth testing. We have 32GB of DDR5 RAM installed at 6000MHz for a 1:1 memory/IMC ratio. We use an ATX 3.0 Compliant power supply. The Silicon Power XS750 1TB PCIe Gen4 NVMe SSD is used as the boot drive with Windows 11 and applications for benchmarking, and it runs across the Chipset PCIe lanes, to allow the SSD being tested to fully utilize the PCIe lanes from the CPU.
The EVGA GeForce RTX 3060 XC BLACK GAMING video card is specifically chosen so that we can run Forposken, and Final Final Fantasy Endwalker Benchmark to test game load times. The EVGA GeForce RTX 3060 XC BLACK GAMING has 12GB of VRAM to reduce bottlenecking of game load times and runs on the primary PCIe x16 GPU slot.
Software Configuration
Software configuration is important. We run Windows 11 Pro with the latest Windows updates and releases. All drivers are kept up to date, as the AMD Chipset driver version is of the utmost importance to maintain the best I/O performance. We make sure to update chipset drivers as new versions are released. We also keep our benchmarking software up to date.
We disable Core Isolation/Memory Integrity (VBS) in Windows 11. We keep Game Mode enabled. We set the Power Plan to Balanced in Windows 11. Resizable BAR is enabled.
SSD Installation
Installation of the SSD is straightforward. We put the SSD into the motherboard’s M.2_1 slot, the M.2_1 slot has direct PCIe lane communication with the CPU. This is the primary M.2 slot.
We review the SSD as it is shipped, packaged, intended, and advertised. If the SSD comes with a pre-installed heatsink, we review it as such. If the SSD comes with a heatsink in the package that is not pre-installed, but intended to run with it, and it is included in the box, we put the heatsink together and test it as intended and advertised. If the SSD does not come with a heatsink at all, we test the SSD bare, as it is shipped.
Setting It Up
After installing the SSD we boot into Windows off of our primary SSD. The reviewed or tested SSD is always the “secondary” SSD in the system or D: drive. We initialize the SSD and create a new partition with the NTFS file format.
The next bit of business is to install the SSD software that is available from the manufacturer and check their webpage for firmware updates. We always perform a firmware check and update before we begin any testing.